This module has five parts. First, we’ll practice fire safety, then wood fires, cook stoves, charcoal stoves, and safely extinguishing fires.
Start at the beginning, and work until your grade level icon says, “CLICK HERE.”
Fire Safety
Camp Fire Rules
Here are three BIG fire safety rules. Another camp rule that is especially important is to walk safely around fires - never run or stand/walk on benches, stones, or logs.
Watch this intro video about fire safety at camp and what we’re going to learn in this station, emphasizing safety along the way:
Wood Fires
Fire Safety
Watch this video to learn what safety precautions to take before starting a fire:
practice
Explain to a family member or friend:
why hair should be tied up when working near fires,
what clothing should be worn near a fire, and
what other safety precautions are needed. Be prepared to show these skills at a pretend fire or one started by an adult.
Campfire Locations
Finding the right location to build a fire is very important. Knowing how to choose the location allows for us to remain safe while using our fire and utilize the principles of Leave No Trace. To find the right spot for a fire, use these basic tips:
Try to use an already existing fire circle or reusable fire bowl
Make sure you are at least 15 feet away from anything flammable, like bushes, trees, tents and buildings
Try to choose a spot that is dry, bare dirt
If you are unable to find a dry/bare spot, find a spot that is at least 10 feet wide. Clear out debris like sticks, leaves, plants, and low-hanging branches in the spot you choose.
After you have cleared a spot, dig a hole about a foot deep to build your fire in, unless the campground or park prohibits it. Make sure you save the dirt and cover the hole well after your fire to assist with making the ground the way that it was when you arrived.
Creating a Wood Pile
When you are building a fire, it is really important to know the types of fuel (wood) you will need. There are 3 types of wood that we generally collect, and they are:
Tinder
dead twigs that are about the width of pencil lead and no bigger than your hand (no living or green wood)
Kindling
wood that is about the thickness of your thumb and about as long as the space from your thumb to forearm
Fuel
about as thick as your wrist and as long as your whole arm
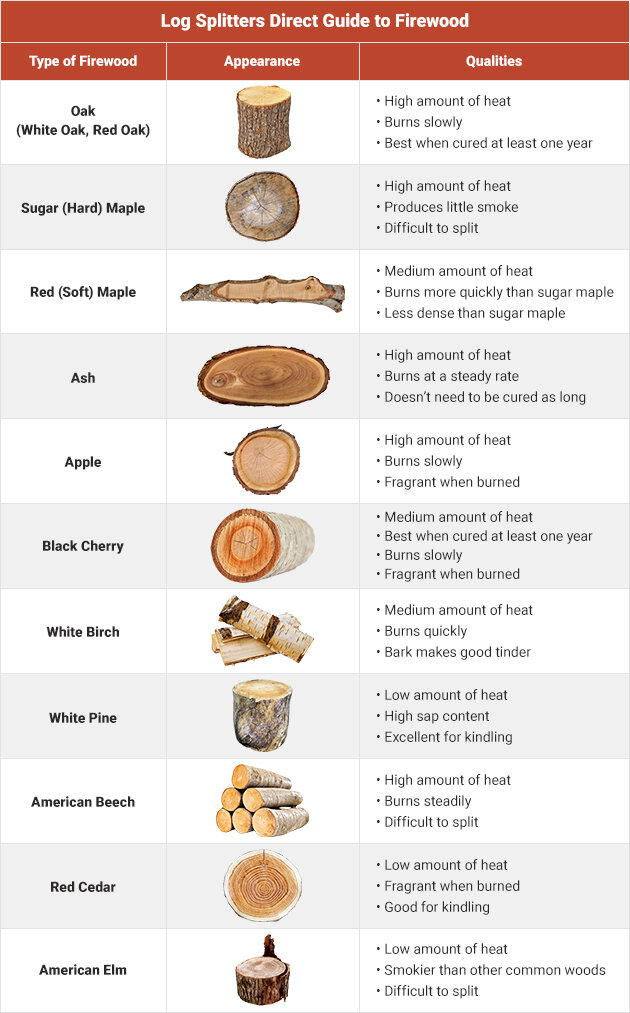
Use the infographic and videos below to learn more about choosing the right types of wood to make your fire successful:
practice
Look for wood in your backyard or neighborhood to help you make a wood pile, including all three types of firewood.
Types of Wood
When picking wood for your fire, there are generally two options: You can pick your own wood from the forest, or you can buy wood and bring it with you. If you have to pick your own wood, use Leave No Trace principles by only scavenging for dead wood. You also want to make sure that you are not removing more wood from the forest than needed, as dead wood is part of the forest ecosystem. If you can, especially in locations where people camp a lot (like Girl Scout camp, campgrounds, and parks), buy wood, and check to see which types of wood are approved for your area.
There are also two categories of wood to pick from: hard wood and soft wood. Generally, you want to use hard wood:
Hard Wood
Oak
Birch
Ash
Soft Wood
Cedar
Pine
Larch
Here are more details on different types of wood and when they may be best to use:
DO NOT use the following types of wood for campfires:
Non-Local Wood
Green (Live) Wood
Treated or Painted Wood
Driftwood
Environmental Impact
Fire building is a fun and important part of camping and outdoor cooking, however, the way that we choose to build and maintain our fires can have an impact on the environment. Having fire while outdoors helps us purify water, cook our food and stay warm!
But how do we collect firewood for our fires? And what impact does it have on the world around us? Believe it or not, picking up wood from the ground of the forest is not the best plan! And here is why – the layer of dead branches, logs, twigs, leaves are all habitat for animals in the forest. When we take wood from the forest for our fires, we are removing animal homes and taking away a step in the cycle of the forest. Girl Scouts work to leave no trace when they go places, especially when we are outdoors.
So, where should we get the wood for our fires when we are camping or backpacking? Ask the camp where you are staying if they have a place to retrieve wood. If you’re camping or hiking, you can also buy bundles of firewood at the store and bring them along with you, instead of taking the green (living) branches from living trees.
What about wood we use for stick cooking hot dogs or marshmallows? The wood in the bundles won’t work because it is too large, but you can actually buy long roasting forks or skewers for this exact purpose! The best part, you can reuse them over and over again and it saves the trees that we love to camp around.
Look at the infographic below for important safety tips you should use EVERY TIME you are building a fire:
Fire Building
Watch this video to learn how to prepare for, build, and maintain a fire. At the end, you will also learn how to put out (“extinguish”) your fire.
Types of Fire
As you become more comfortable with campfires, you’ll want to learn about different ways to build them. Here’s an overview of some of the fire structures we use most at camp:
Fire Building Snack
One way to practice fire building skills without starting an actual fire is to make an edible fire! Edible fires help build skills, can be made with all sorts of ingredients, and taste great. Our campers love them! As an optional activity, pause your camp activities to create an edible fire as a snack.
Match Safety
Visit this site to learn how to strike a match safely. This includes match-lighting basics, match-lighting tricks, and how to hold a lit matchstick safely. Remember, some of the match-lighting tricks should only be used in emergencies, and you should only use fire with an adult’s permission and supervision.
Then, draw and write a story about how to safety use matches using this comic strip template or by drawing your own template boxes.
Match Practice
It is really important to know how to safely light a match when you’re building fires. Make sure that you follow these basic rules before you start lighting your match:
Be at least an arm’s length away from anyone around you
Have at least 3 points of contact to the ground with your body - (Two knees, and an elbow for example)
Then follow these steps to safely light your match:
Take the match out of the box and close the box
Grab the match about half way up the stick
Strike the match by starting at the point in the box closest to you and moving down the box, away from your body
Carefully lay the match into your pile of tinder, flame side up because fire burns up.
Practice
With an adult’s permission and supervision, practice safely lighting a match and/or lighter to light a candle, fire, or cook stove.
Match Alternatives
Sometimes you will find yourself camping or in an emergency where you need a fire but you do not have matches or a lighter. You may have accidentally forgotten to pack them or your matches may have gotten wet. In any case, it is really helpful to know how to build a fire using alternatives. Review the video below to learn how to build a fire using:
Flint and steel
magnifying glass, eye glasses, or binoculars
friction (bow and spindle)
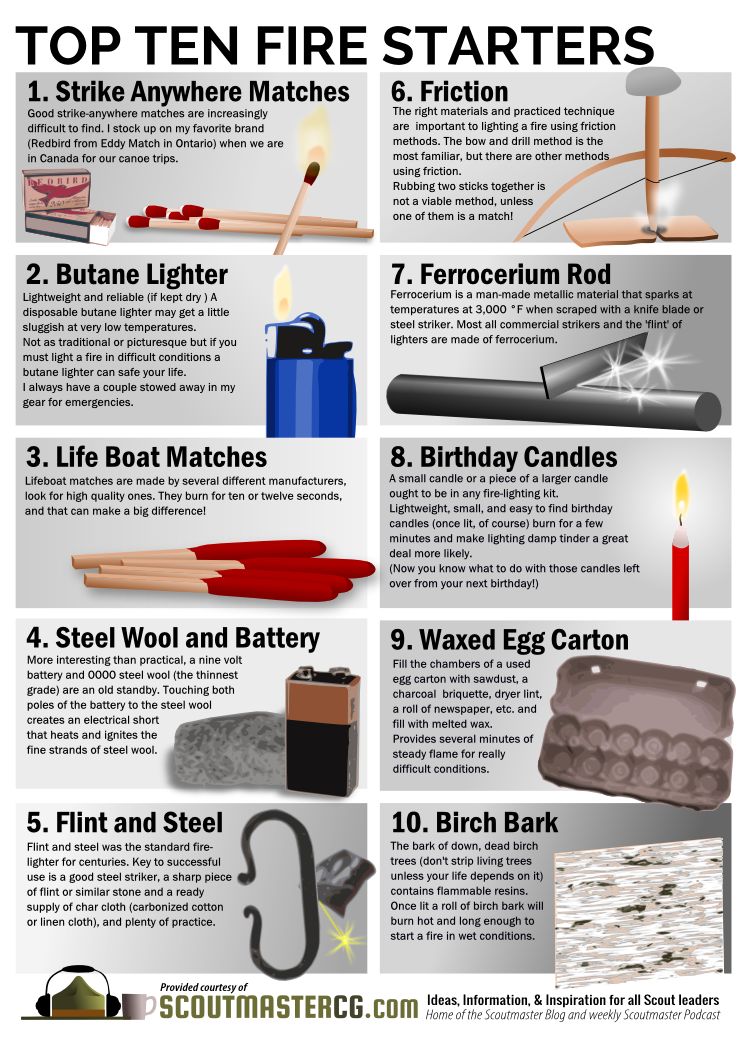
The infographic below offers some additional ways you can use to start a fire without matches/lighter:
PRACTICE
Become an expert by trying out these methods at home or camp. The more you use them, the better your skills become in case you ever need to use them in an emergency! Plus, this is a pretty cool trick to show others and impress them with your Scouting skills!
Fire Practice
With a grown up, practice setting up, lighting, maintaining, and extinguishing a fire at home! As an added bonus, consider using the fire to prepare an outdoor cooking meal, or roast marshmallows!
Cook Stoves
Cook Stove Safety
Cook stoves are a really great way to prepare food while you are camping or backpacking and help lessen our impact on the environment. Cook stoves differ in types and the kind of fuel they use. Make sure that you read the manufacturers instructions before you begin using your stove. Following these safety tips to ensure you have a safe and successful cooking experience:
1. Always carry enough fuel for your trip and store it away from your cooking area and stove flame
2. Never use portable cook stoves inside of a tent
3. Keep the stove clean. Make sure the lines and burners are not clogged.
4. Do not refuel the stove or fill canisters near an open flame
5. Be careful not to spill fuel. If you do spill fuel, relocate the cook stove to another area before lighting and using.
6. Place the stove in a safe, stable and level position, shielded from the wind. Never place rocks or other items around the stove to stabilize it.
7. Use pots that are the right size so the stove is not top heavy.
8. To prevent combustion and fires, do not dispose of pressurized cans in the fire, leave them in direct sunlight, or store them in high temperature areas to prevent combustion and fires. Dispose of the cans according to the manufacturer’s instructions on the label/directions.
9. Always check with the area you are camping in to be sure portable cook stoves are allowed during times of extreme fire danger.
Lighting a Cook Stove
Portable cook stoves are an awesome way to prepare delicious meals while camping! Following all of the above safety tips, use the video below to learn how to safely use a cook stove.
Cook Stove Practice
Now that you have learned how to safely use your cook stove, it is time for practice! Remembering your safety rules above, utilize our Outdoor Cooking activities to pick out a recipe to try! You can also use the internet to search for alternative recipes for “hiking cook stove” or “camping stove top.”
Backpacking Cook Stoves
When backpacking on multi-day trips, food and cooking is a very specialized skill. You’ll need specialized equipment, specialized recipes, and, in some cases, specialized ingredients. Here’s an overview of how to use a backpacking camp stove:
Some backpacking cooking stoves, like the Jet Boil, only boil water. When backpacking, this may be all you need, depending on your recipes. Here’s an overview of how this tool works:
Lightweight backpacking equipment tends to be fairly expensive, so it’s important to research your options well and know what you’re getting into before purchasing gear. In thinking about backpacking stove choices, here’s an overview from REI that you might find helpful:
To learn more about backpacking stoves and cooking techniques, check this page from REI:
Charcoal Fires
Charcoal Safety
Whether you are using charcoal in a grill or in a fire circle, the safety rules are very similar to wood fire safety rules. Here’s a reminder of grill safety rules:
Charcoal Fires
Charcoal is a slow-starting fuel, so be sure to allow plenty of time before you need to cook (at least 20-30 minutes). Once started, you have a nice bed of coals for toasting, baking, and other kinds of coal cooking.
What You Need
Fire pit and/or Grill
Charcoal (know your charcoal). Some brands start much more easily than others.
Fire starters: solid ones that you can make at home (e.g. trench candles, egg carton type, kisses, etc.). Note: Council strongly discourages the use of liquid charcoal starters because they are extremely flammable. These should never be used by girls and are discouraged for adults.
Firefighting equipment: a metal bucket full of water and a shovel for each fire. Put a “critter stick” in the bucket.
Wooden safety matches.
Charcoal chimneys: a device that helps charcoal heat to cooking stage faster. You can build your own by using a large coffee can or #10 can with both ends removed. Punch holes around each edge with a can opener, punch another series of holes around the middle, and attach a wire or coat hanger for handle.
Where to Build
In a fireplace or fire ring that meets the same standards as those for wood fires.
In a charcoal stove with a closed fire pan which does not permit ash or coals to drop on the ground.
In a fire pan, such as the bottom of a barbecue grill.
How to Build
In fireplace or fire ring, prop the charcoal chimney up slightly on a piece of charcoal to ventilate.
Place a few fire starters at the bottom of the can. Then fill it with charcoal. Mixing fire starters in with the charcoal as you go can be helpful.
Light the fire starters from underneath.
In 20-30 minutes, when coals have begun to get hot (they will be grey), lift the can with pliers and let the coals spread out for cooking.
How to Extinguish
If coals have burned completely, the fire can be put out similarly to a wood fire by sprinkling water and stirring the coals.
Hot coals that have only partially burned should be dropped in a pail of water and allowed to soak for an hour or more.
Watch the following video for demonstrations on how to implement these skills:
Charcoal Practice
Now that you have learned how to use charcoal bricks for cooking, it is time to practice this new skill! This is Program Director Georgi’s favorite type of cooking. She loves one pot desserts, like peach cobbler, cooked in a dutch oven over coals. Use the recipes in our Outdoor Cooking activities to give your new skills a try!
Extinguishing Fires
Putting Out Fires Safely
Building and using fires is a necessary and important skill to have and use while camping. An important part of fire safety is knowing how to put out the fire correctly and safely. Here are a few important steps for putting out your fire:
If the fire is still flaming, use the critter stick to spread out the wood in the fireplace or ring. Flames should go out shortly.
Sprinkle water over wood and ashes, and then stir.
Repeat until there are no live coals and you can comfortable press your hand on all dead coals.
Use a wool blanket to smother a fire only in an emergency (i.e. a great or ground fire that is out of control). Smothering a fire with dirt or water does not guarantee that the fire is out. Buried hot coals may smolder for days and start an underground or surface fire after you are gone.
Leave the ashes in the fire ring for those who follow. It eliminates the danger of burning hot coals and encourages repeated use of the same site.
Use this video as an example of how to put out your fire:
Extinguishing Fires Practice
Now that you have learned the right way to put out your fire, give it a try. You don’t have to build a fire specifically for this purpose. Try combining it with your outdoor cooking requirements. Remember to follow all of our safety tips and SPRINKLE, don’t dump!
Celebrate! Send us a picture or video of you completing a fire building activity.
Let us know what you loved about the fire building activities and what we can improve.
Return to the main Virtual Camp page to complete the next skill station, Outdoor Cooking.


